
Make an Easter Bunny Wreath

With just two weeks to go, it’s time to get crafting!
If you want to make something unique this Easter, it doesn’t get much more unique than these Easter Bunny wreath. Perfect for hanging on walls and front doors, this festive friend is reusable and makes the perfect conversation piece. Here’s how to make one:
What you will need:
Fimo air drying clay 250g
Wreath base
Craft knife
Scissors
Wire
Mod Podge glue
Art Trays (optional)
Glue Gun and glue sticks
Deco papers (Tissue paper can be used instead)
Decorations (eggs, feathers, birds, or make some with your clay)
Flowers (real or artificial)
Foliage (real or artificial)
Let’s begin!
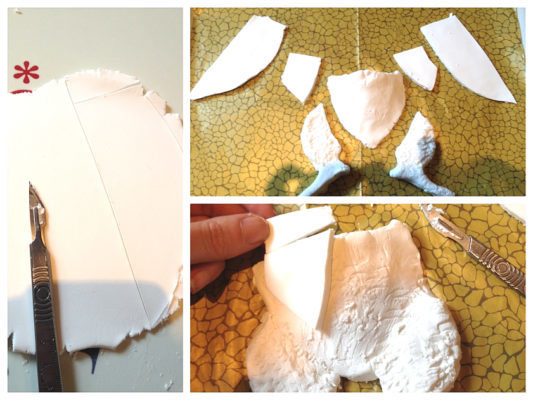
1. Start by cutting the clay block in half and putting one half aside. Then roll it out until it’s about 6-8mm thick and cut out the shapes of the bunny’s legs, belly and coat tails. A craft knife is the best tool for accuracy, but you can use any clay cutting tool you like.
Tip: Working on art trays makes this process much easier as it means you can work anywhere and keep your creations separate and safe while they dry.
2. Start bonding your pieces together. Score both surfaces that you want to bond, add a small amount of water and push the clay together. Give the bunny’s legs and belly a nice textured look by using your craft knife blade to score the surface and then smoosh the clay to give it a bumpy texture.
3. With the belly you want to curve around the edges to make it 3D. Roll a ball of clay and bond it to the back of the belly piece as an extra support. Then bond the legs to the belly and layer over the smooth coat tails pieces.
4. Pop your pieces in the microwave for 10 minutes (Don’t forget to put a small pot of water in with it – read the instructions on the clay packet). Let it cool down afterwards as the plate gets really hot. Any leftover clay can be used to make eggs, clocks or whatever you wish to put on your wreath. Just remember to put holes in the top so you can thread wire in them to attach it to the wreath later on.
5. Now let’s start on the hat and ears. You create these using the other half of your clay block and your craft knife, and then bond the pieces together and cook in the microwave, following the instructions on the packet.
Now for the fun part!

6. Time to decorate the rabbit! Using decorative papers is best because they are easy to use, come in a variety of fun patterns, they’re less messy than paints and the finish is great. Simply apply your deco paper to your rabbit’s hat and coat tails using your mod podge glue and leave to dry.
7. Once dry, attach your clay pieces to your wreath using your glue gun. Press firmly and leave to dry. Then coat your entire rabbit in more mod podge to give it a shiny finish and protect it from the weather.
8. Begin weaving your foliage into your wreath with wire (or glue it on with your glue gun) to create a base layer of greenery. Then start attaching your decorations (you can create these using your clay or buy decorative eggs, feathers, birds and other Easter items).
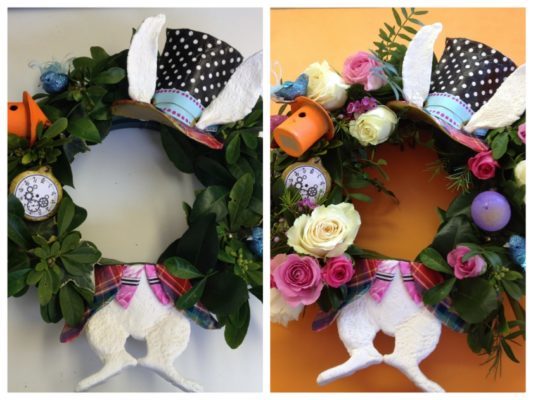
9. Finally, weave or glue in your flowers and tweak until you’re happy.